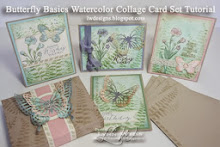
I shared a card here on Friday and have since gotten several emails asking exactly how to do the background. It's a really fun technique to play around with and very simple to get beautiful results. I'm not really sure what it's called...so I'm just going to call it the watercolor background technique. I took photos of each step to show you exactly how to do this.
Step 1: Gather supplies. For this project I used:
- Acrylic Block I
- Stampin' Write Markers: Calypso Coral, Rich Razzleberry, Melon Mambo, Bermuda Bay, Pear Pizzazz & Old Olive
- Whisper White card stock cut 5 1/2" x 4
- Stampin' Spritzer filled with water
Step 2: Swipe markers across acrylic block to create strips of color, blending each color into the next as shown below.
Step 3: Lay the block onto Stampin' Scrub and spritz with water. I found that about 4-5 spritzes across the block was perfect...but this is really where you'll have to experiment to find the look you are going for.
Step 4: Pick up block and tilt slightly if you wish to blend colors further...it will look something like this.
Step 5: "Stamp" your background onto your base, being careful to lay it down straight. I left about a 3/8" border along the top (which will actually be the side of my finished card)
Hint: press on the block and allow it to sit for a minute so the paper will absorb all the ink & water.
Allow the panel to dry before going on to the next step. I just kept making more back grounds and when I was done with that the panels were dry...so maybe an hour or so. Or if you are in a hurry use your heat tool to speed up the dry time.
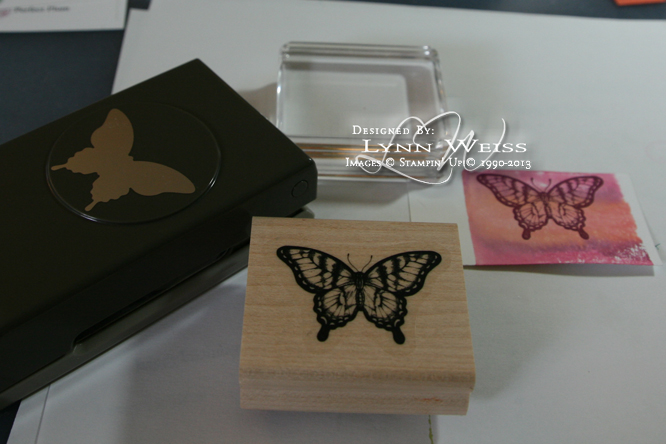
Hint: Create a small background, using this same technique & colors, on some scrap for any images you may want to stamp & punch out.
Step 6: Use post it notes to mask the edges of your watercolor background.
Hint: if your ink pads are very juicy, you may want to also use some scrap paper over the post it notes so that the ink doesn't bleed through.
Step 7: Stamp your focal images first. I used the
Papillon Potpourri stamp set with Tangerine Tango, Rich Razzleberry & Island Indigo ink.
Step 8: Stamp your small scrap background to punch. I used Rich Razzleberry.
Step 9: Fill in with a swirl...I used the pretty flourish from
Everything Eleanor inked in Rich Razzleberry, Melon Mambo & Coastal Cabana.
Step 10: Stamp
En Francais over entire design. I inked mine in Island Indigo and then stamped it off once so it wasn't so dark. I also pressed in the areas that I wanted it to be a little darker.
Step 11: The best part! Pull off the post it notes to reveal your fabulous work of art! Proceed to embellish as you wish to create your finished card. Here's what mine looks like...
I used the
Needlepoint Border to emboss my edges, popped up the punched out butterfly and stamped my sentiment, from
Blooming With Kindness, in Coastal Cabana and adhered it to a base of Pool Party card stock.
I hope you'll give this technique a try, if you haven't already. I also hope you like this look because I'll be sharing several more cards I have created using this technique in the next couple weeks.


16 comments:
WOW - this is beautiful!Thanks for sharing.
Great tutorial! Beautiful work -
This is so very pretty! I'm going to have to try it! Thank you for sharing!
How cool is this technique? Thanks so much for sharing it. Your card is absolutely stunning!
This is gorgeous! Thank you for the tutorial and I look forward to your other examples!
oh, beautiful ! thanks !!
Beautiful work! Thanks for sharing the tutorial!
Really beautiful. I may have to try this soon. Thank you for sharing.
Wow your card is beautiful! It looks like DSP. Hugs
I love your card and technique. I am trying it, but I get whites plot he's in the color areas. I can't get it smooth like yours. Do you have any suggestions?
yhanks for tis beautiful tutorial
How kind of you to take the time to document and photograph each step so that we can learn from you. You sure created a gorgeous card!
Thank you!
This was a wonderful tutorial. I loved all your ideas and all the colors you used. I will give it a try. Thanks for sharing.
Marge
Beautiful! Easy to follow, thanks for sharing
Spot on with this write-up, I truly feel this site needs a lot more attention. I'll
probably be back again to read more, thanks for the information!
Beautiful! Thanks for the tutorial!
Post a Comment